01
Save your first prompt
A prompt is any instruction you give an AI. Saving the good ones means you never have to rewrite them.
- 1Click "New Prompt" in the top-right corner — it works from every page.
- 2Give it a short title and paste the prompt text.
- 3Optional: pick the AI tool it works best with, rate it, and add tags.
- 4Click "Create Prompt". Done — it's saved forever.
02
Store and compare AI results
Run the same prompt through Claude, ChatGPT, and Gemini — then store all three responses in one place. No more copying outputs into a separate doc.
- 1Open any prompt and click "Edit" (or add a result while creating a new prompt).
- 2Scroll to the Results section. Click "Add result", select the AI model from the dropdown, and paste the response.
- 3Repeat for other models — you can store up to 7 results per prompt.
- 4Click "Save". Each result appears on the prompt detail page with its model badge so you can compare them at a glance.
03
Fill-in-the-blank templates
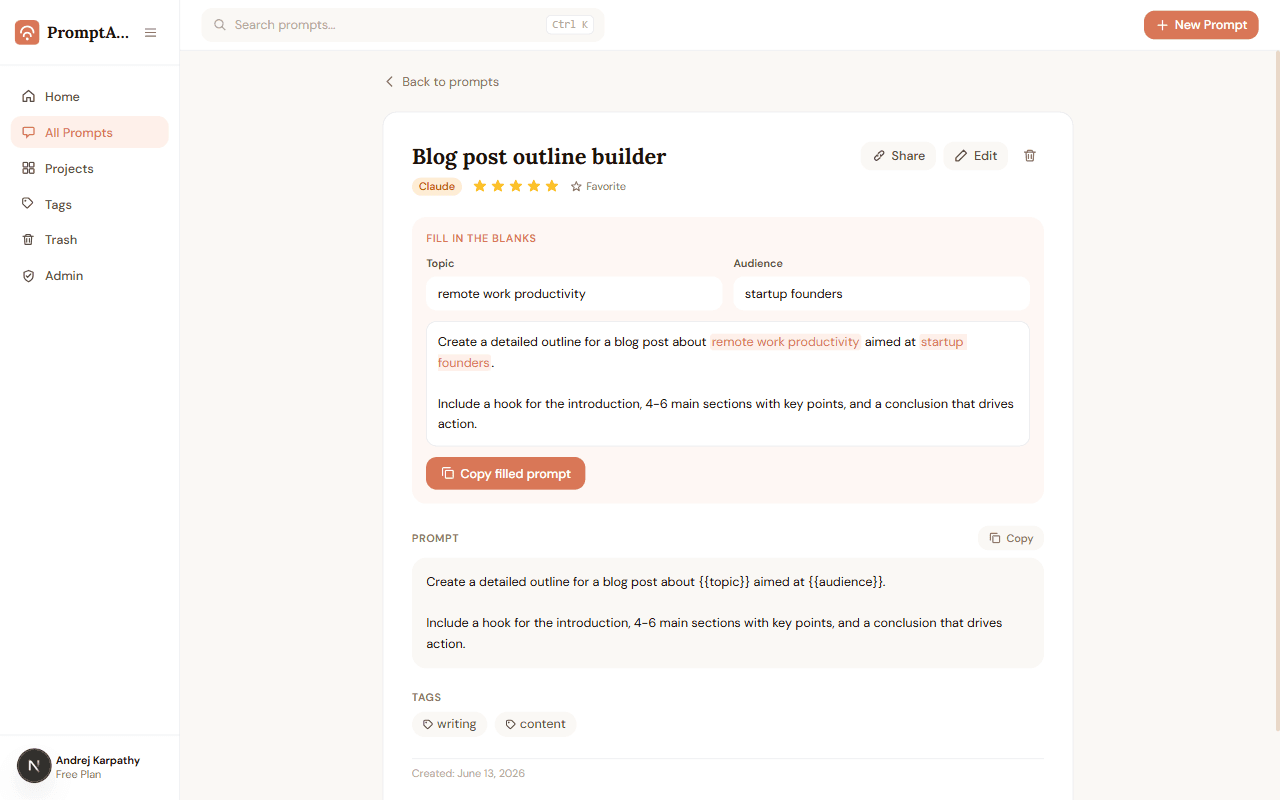
Turn a prompt into a reusable template so you only ever change the parts that change.
- 1When writing a prompt, wrap a word in double curly braces — like {{topic}} or {{audience}}.
- 2Open the prompt later: each {{blank}} appears as a labeled input field.
- 3Type the new values and watch the live preview update.
- 4Click "Copy filled prompt" — the finished text is on your clipboard.
04
Find anything with Ctrl+K
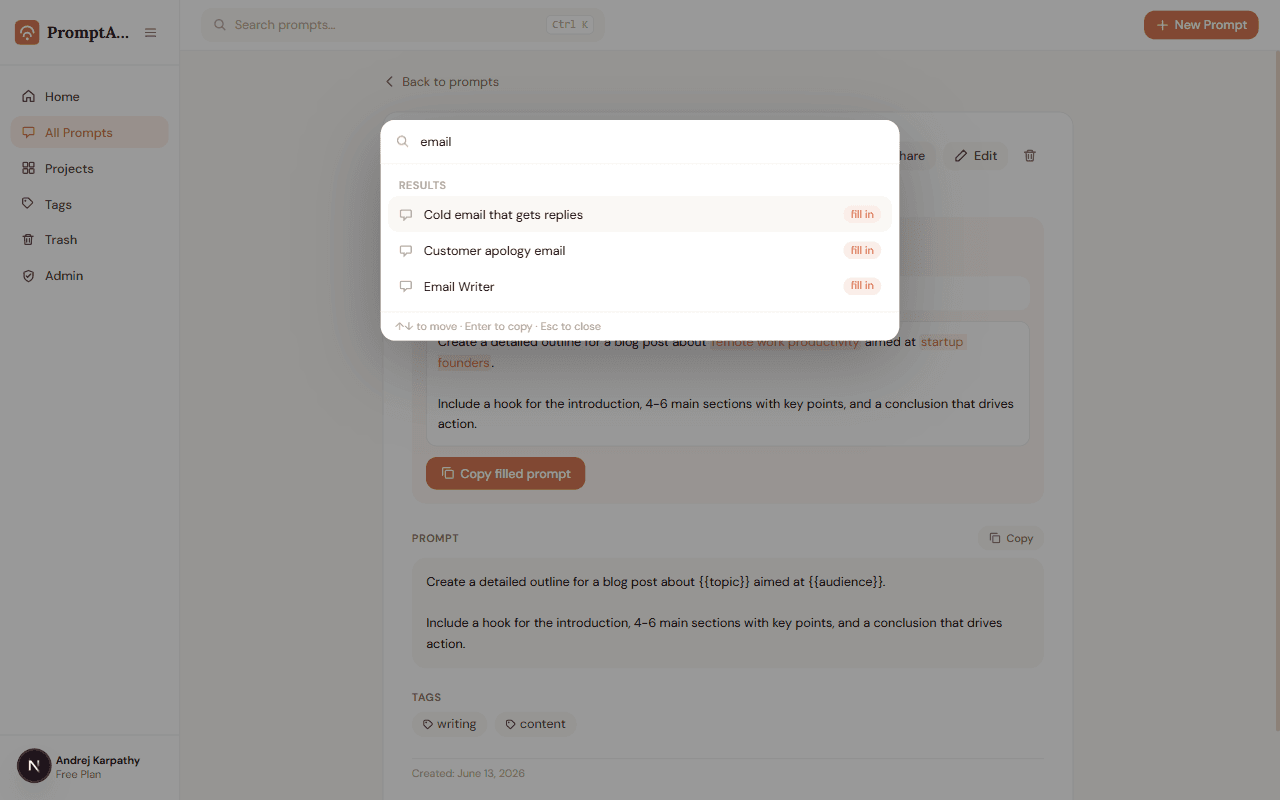
The command palette is the fastest way to grab a prompt — from any page, without touching the mouse.
- 1Press Ctrl+K (or click the search pill in the header).
- 2Type a few letters of the prompt's title or text.
- 3Use ↑↓ to pick a result and press Enter — the prompt is copied to your clipboard.
- 4If the prompt has {{blanks}}, the fill-in form opens right inside the palette first.
05
Import prompts you already have
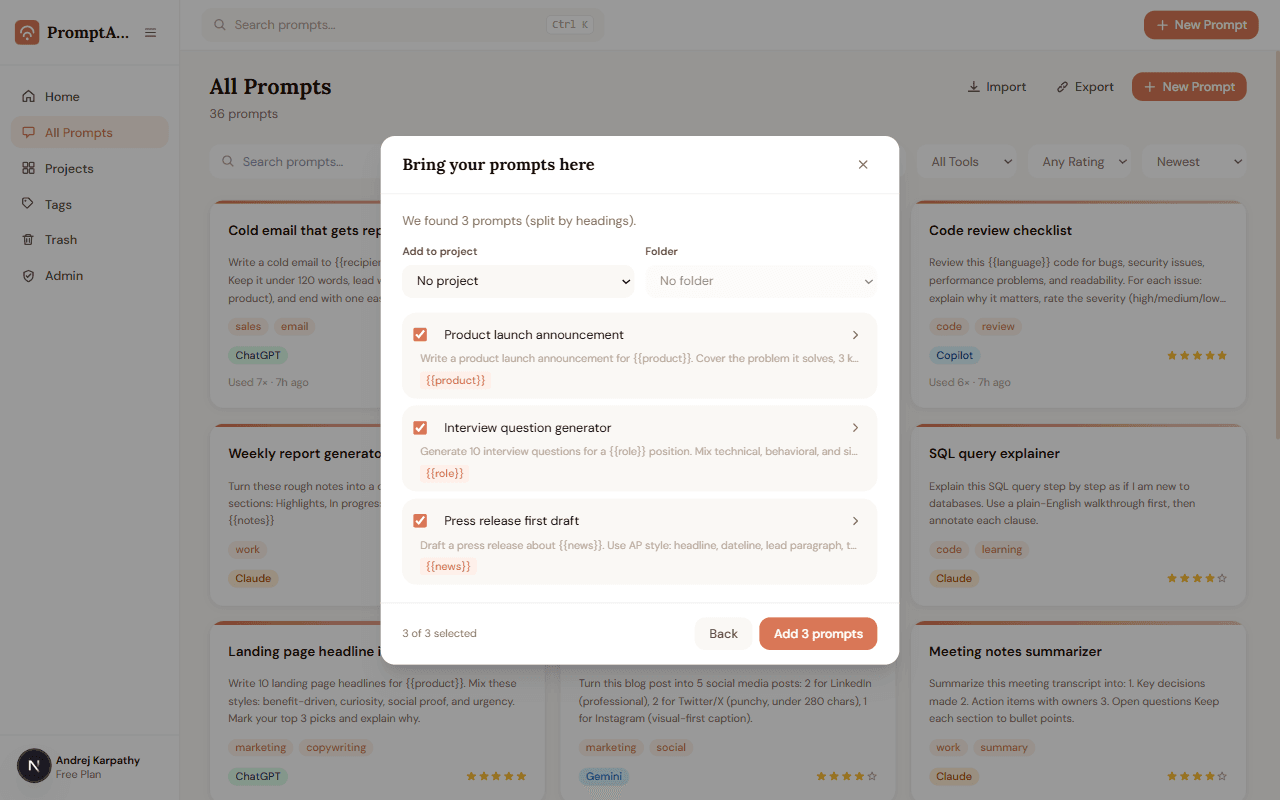
Your best prompts are probably scattered across notes apps, docs, and old chats. Bring them all over at once.
- 1Click "Import" on the Dashboard or All Prompts page.
- 2Paste anything — PromptABCD splits it by headings, --- lines, or blank lines. Or drop in a ChatGPT export file.
- 3Review the list: every prompt gets a checkbox and an editable title. Duplicates are flagged automatically.
- 4Click import — up to 100 prompts land in your library at once.
06
Organize with projects, folders, tags and ratings
A little structure goes a long way: projects for big areas of your life, folders inside them, tags across everything.
- 1Create a project from the Projects page (give it a name, icon, and color).
- 2Add folders inside a project for finer grouping.
- 3When saving a prompt, pick its project and folder — or leave it loose.
- 4Add tags and a 1–5 star rating so your best work rises to the top of searches and sorts.
07
Version history
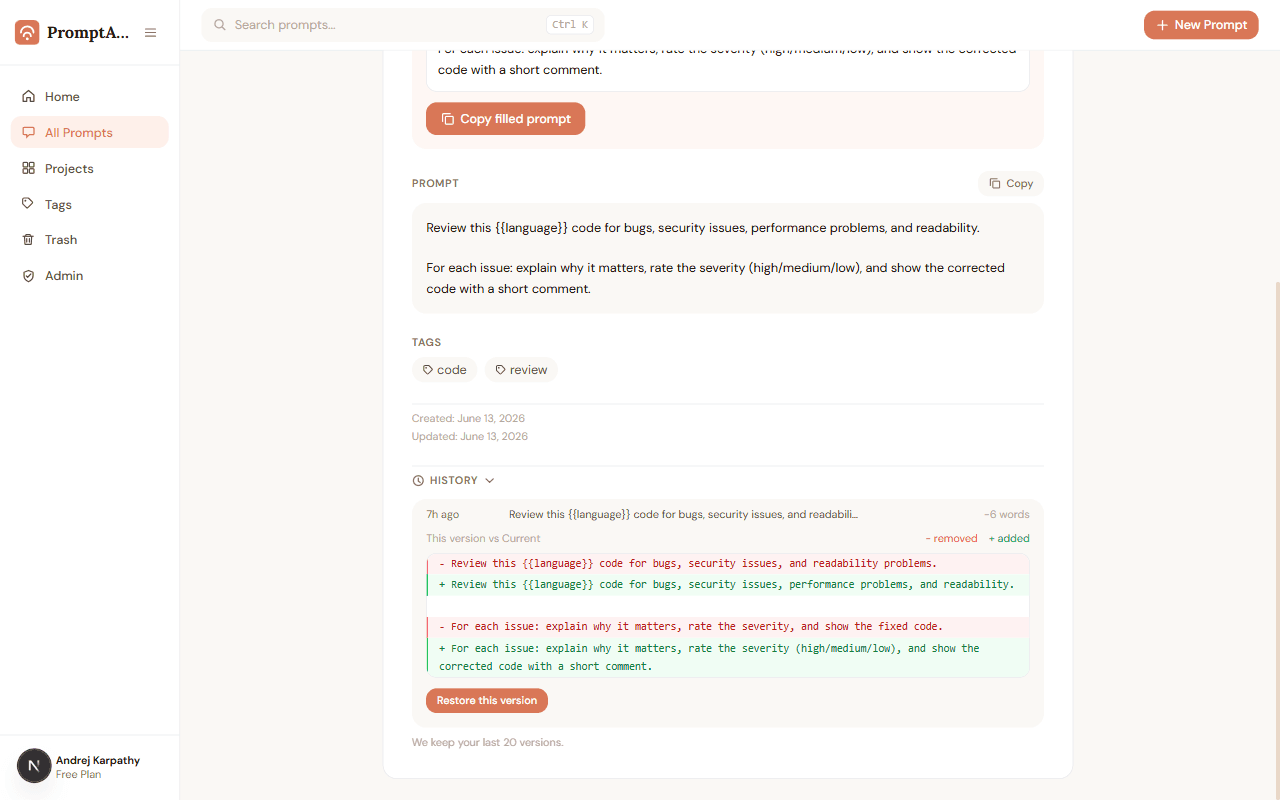
Every time you edit a prompt's text, the previous version is saved automatically. Iterate without fear.
- 1Open any prompt and click "History" at the bottom.
- 2Click a version to see a side-by-side comparison — green lines were added, red lines removed.
- 3Click "Restore this version" to bring it back. Your current text is saved to history first, so nothing is ever lost.
08
Share a prompt with a link
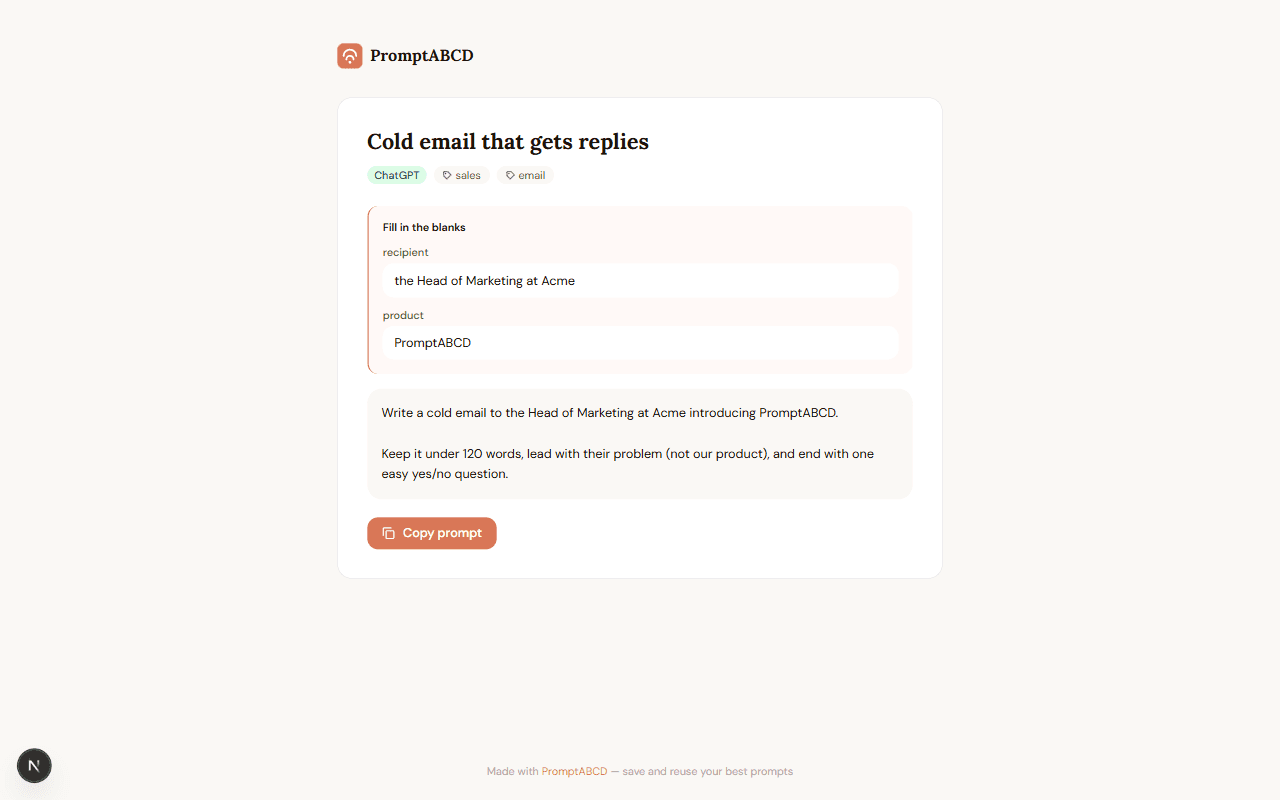
Stop pasting walls of text into chat apps. Send a clean link instead.
- 1Open a prompt and click "Share".
- 2Flip the switch — you get a private link to copy.
- 3Anyone with the link sees a clean page with the prompt and a copy button. They never see your results, notes, or name.
- 4Flip the switch off any time — the link stops working immediately.
09
Trash & Undo
Deleting is never final by accident. Everything you delete is recoverable for 30 days.
- 1Delete a prompt — it moves to Trash, and an Undo button appears for a few seconds.
- 2Open Trash from the sidebar to see everything you've deleted.
- 3Click "Restore" to bring a prompt back, exactly as it was.
- 4After 30 days, trashed prompts are removed for good — or click "Delete forever" yourself.
10
Tag Manager
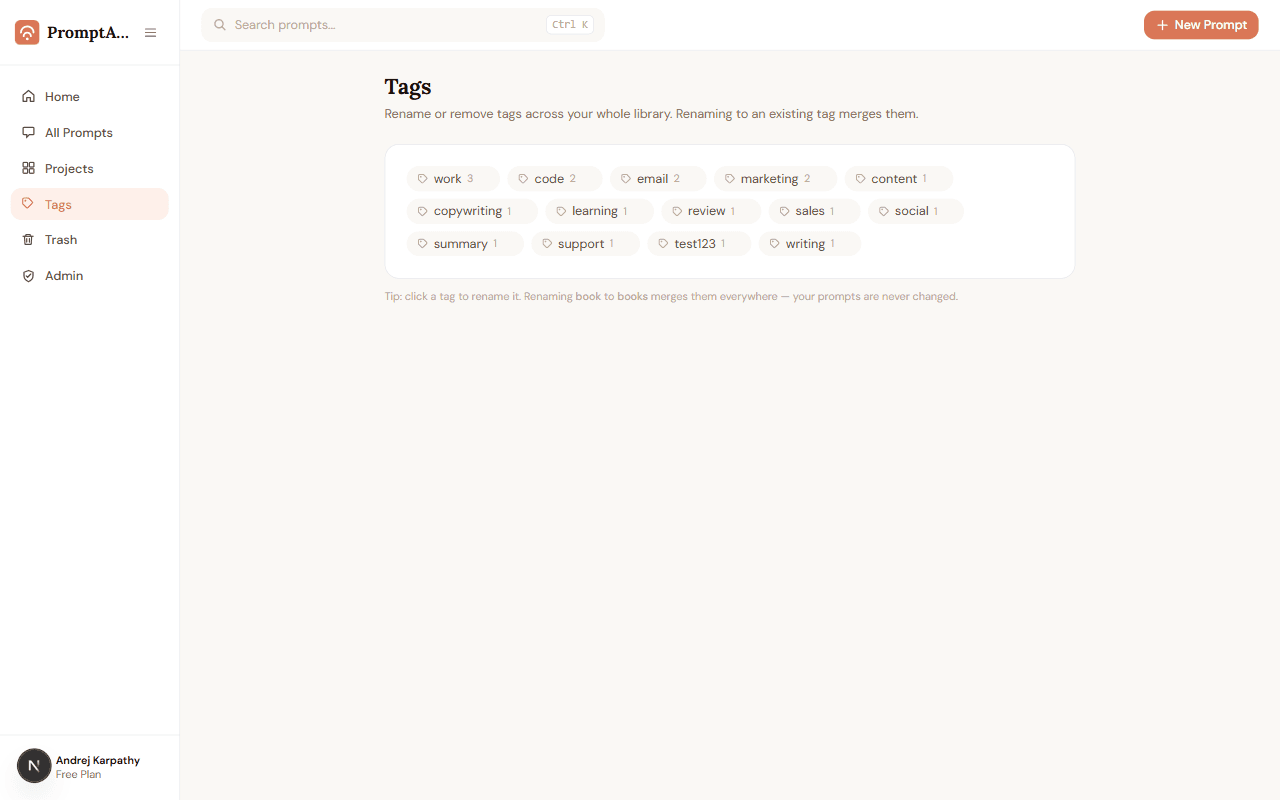
Tags drift over time — "email" here, "emails" there. The Tag Manager fixes your whole library at once.
- 1Open "Tags" from the sidebar.
- 2Click any tag to rename it everywhere it's used.
- 3Rename a tag to an existing name and they merge — no duplicates left behind.
- 4Remove a tag from all prompts with the small ×. The prompts themselves are untouched.
11
Library Health
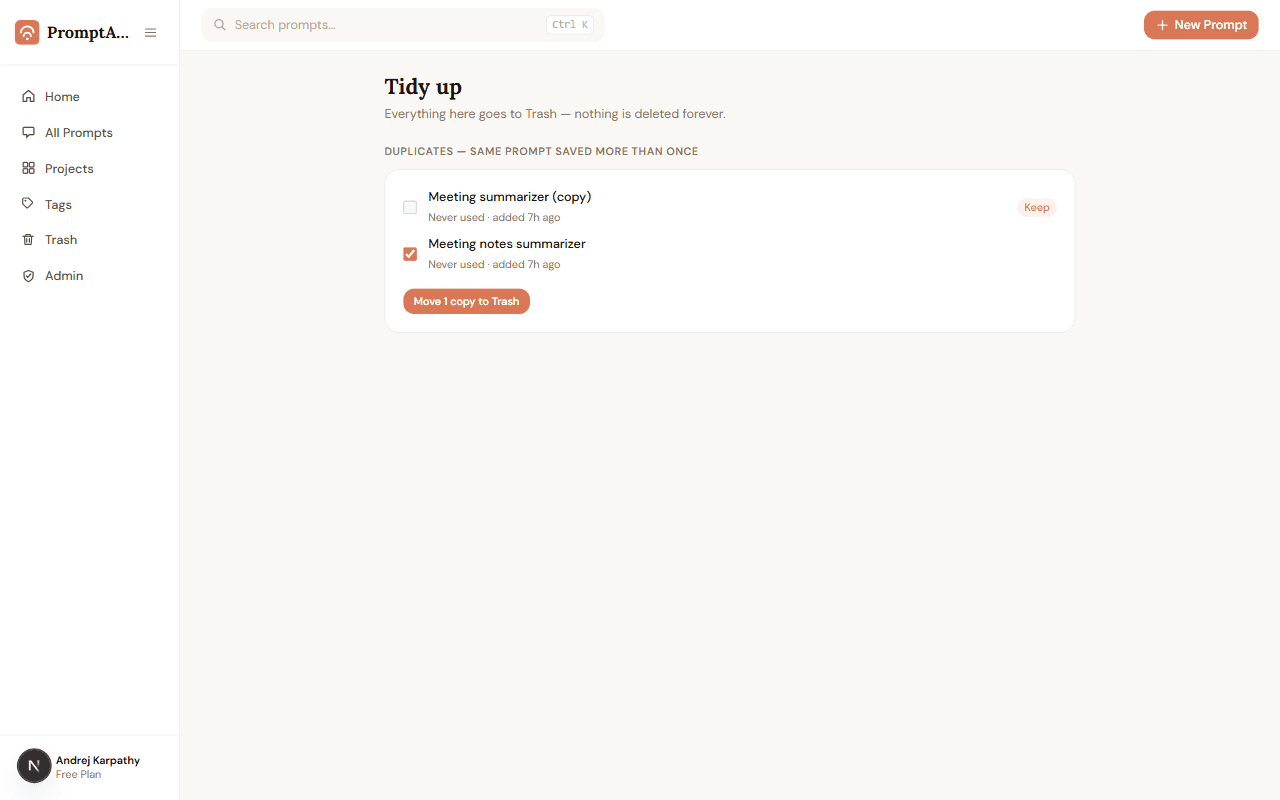
Prompt libraries rot: duplicates pile up, old prompts gather dust. Library Health finds both, and cleanup is always safe.
- 1Check the "Library health" card on your Dashboard — it's always there.
- 2Click "Tidy up" to see duplicate groups and prompts unused for 60+ days.
- 3For duplicates, keep your favorite copy and move the rest to Trash in one click.
- 4Everything goes to Trash, never deleted outright — you can always change your mind.
12
Export & Backup
Your prompts are yours. Take a full copy any time, in a format you can actually read.
- 1Click "Export" on the All Prompts page (or find it in Settings → Your data).
- 2Choose Markdown for a readable document, or JSON for backups and other tools.
- 3The file downloads instantly — every prompt, with its tags, ratings, results, and notes.
13
Usage tracking
Every copy is counted quietly, so you can see which prompts actually earn their keep.
- 1Copy prompts as you normally do — from cards, prompt pages, or the palette.
- 2Each card shows "Used 12×" so winners are easy to spot.
- 3Sort All Prompts by "Most Used" to see your true favorites.
- 4Your Dashboard's Top Prompts list updates automatically.
14
Usage Context — what was this for?
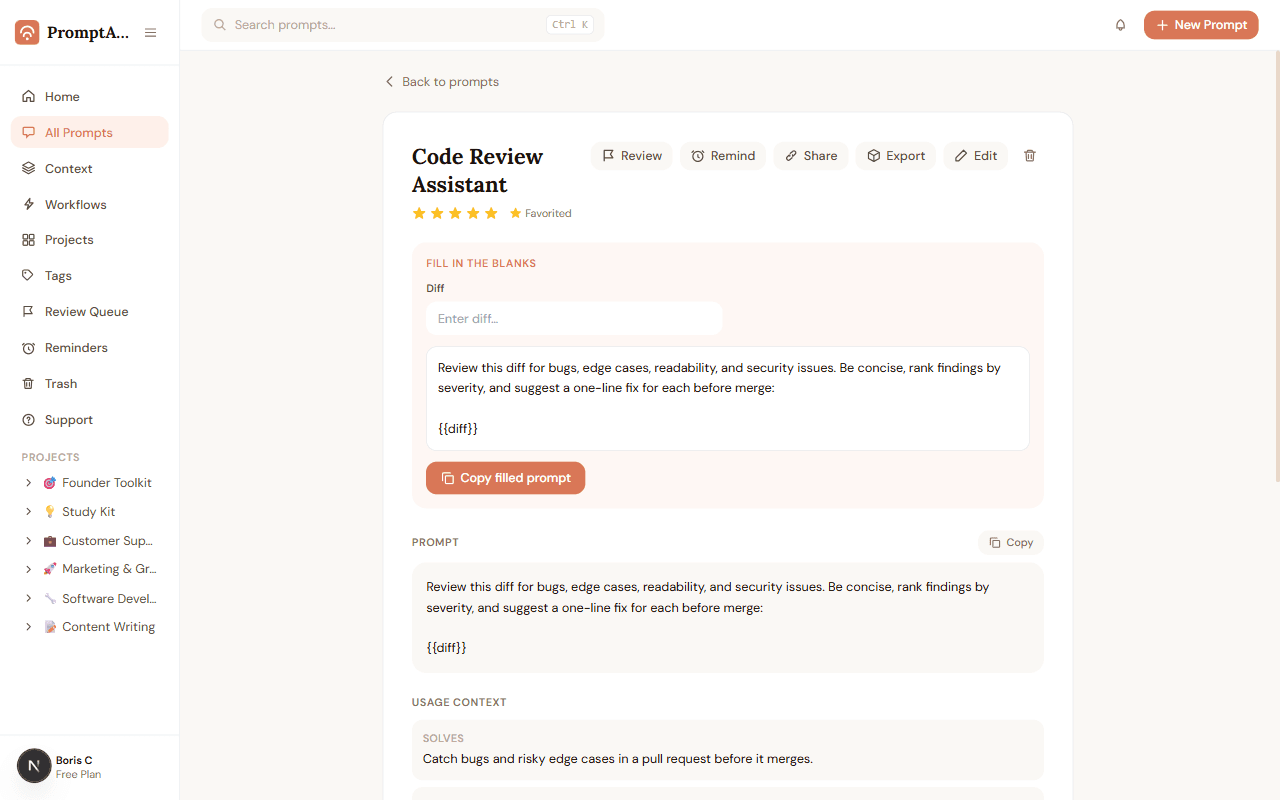
You saved a prompt three months ago. Now you're back and can't remember what problem it was solving, what to paste in, or what it produces. Usage Context solves this.
- 1Open a prompt and click "Edit".
- 2Scroll down to the "Usage Context" section and expand it.
- 3Fill in three optional fields: what problem this solves, what input it needs, and what output it produces.
- 4Save — the context appears below the prompt text on the detail page, labeled Solves / Needs / Returns.
15
Workflows — chain prompts into sequences
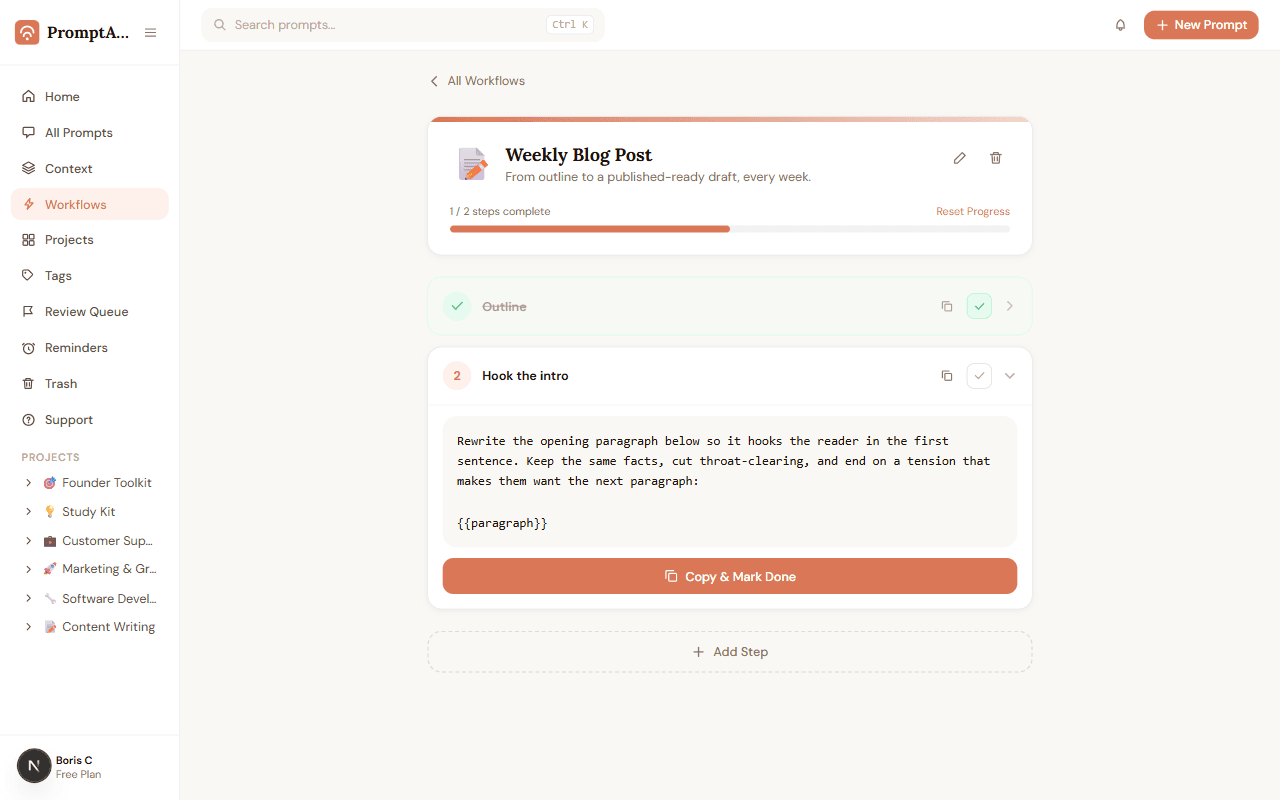
Some tasks need 3–6 prompts run in the same order every time. A workflow keeps them together and tracks your progress through each run.
- 1Click "Workflows" in the sidebar and create a new workflow — give it a name, icon, and description.
- 2Add prompts as steps using the "+ Add Step" panel. Search your library and click a prompt to add it.
- 3Open the workflow runner. Click a step to expand it and see the full prompt text.
- 4Click "Copy & Mark Done" to copy the text to your clipboard and check that step off. The progress bar updates.
- 5Continue through each step. Click "Reset Progress" at any time to start the run over.
16
Scheduled Reminders
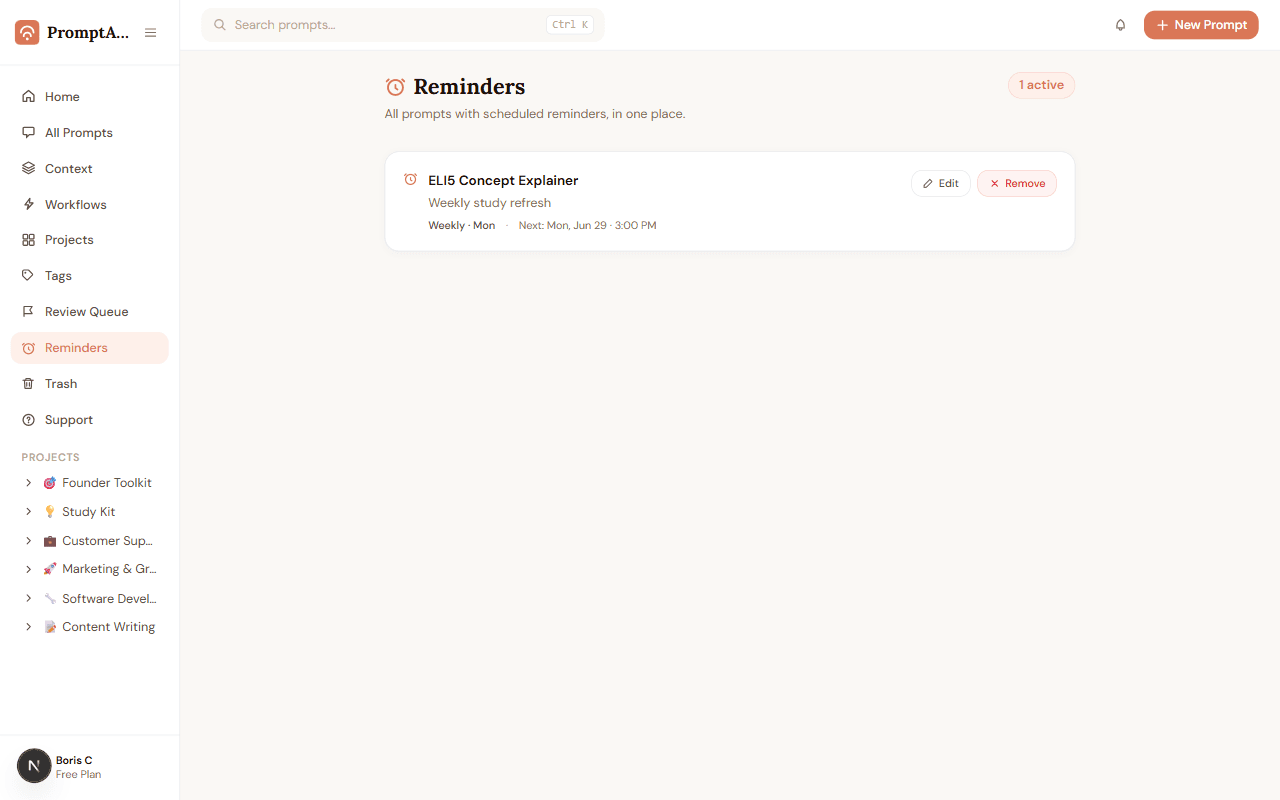
Some prompts are meant to be used every Monday morning or the first of the month. Reminders make sure you don't forget.
- 1Open any prompt and click "Remind" in the header.
- 2Set a label, choose Daily / Weekly / Monthly, pick the day and time.
- 3The preview shows exactly when the next reminder fires — click "Set Reminder".
- 4When a reminder fires, a notification appears in the bell icon in the top header.
- 5Click the bell to open the Reminders drawer. Click "Use Prompt" to copy the prompt text and mark the notification read.
17
Version Changelog — document your changes
Version History shows what changed. Changelog notes tell you why — so you remember whether a change worked, or why you rolled it back.
- 1Open a prompt and click "Edit".
- 2Change the prompt text. The "Reason for this change" field at the bottom unlocks automatically.
- 3Add a short note — "Updated for GPT-4o" or "Rolled back — too verbose".
- 4Save. The note is stored with that version.
- 5Open "History" — each version with a note shows it below the timestamp.
18
Review Queue — flag prompts that need work
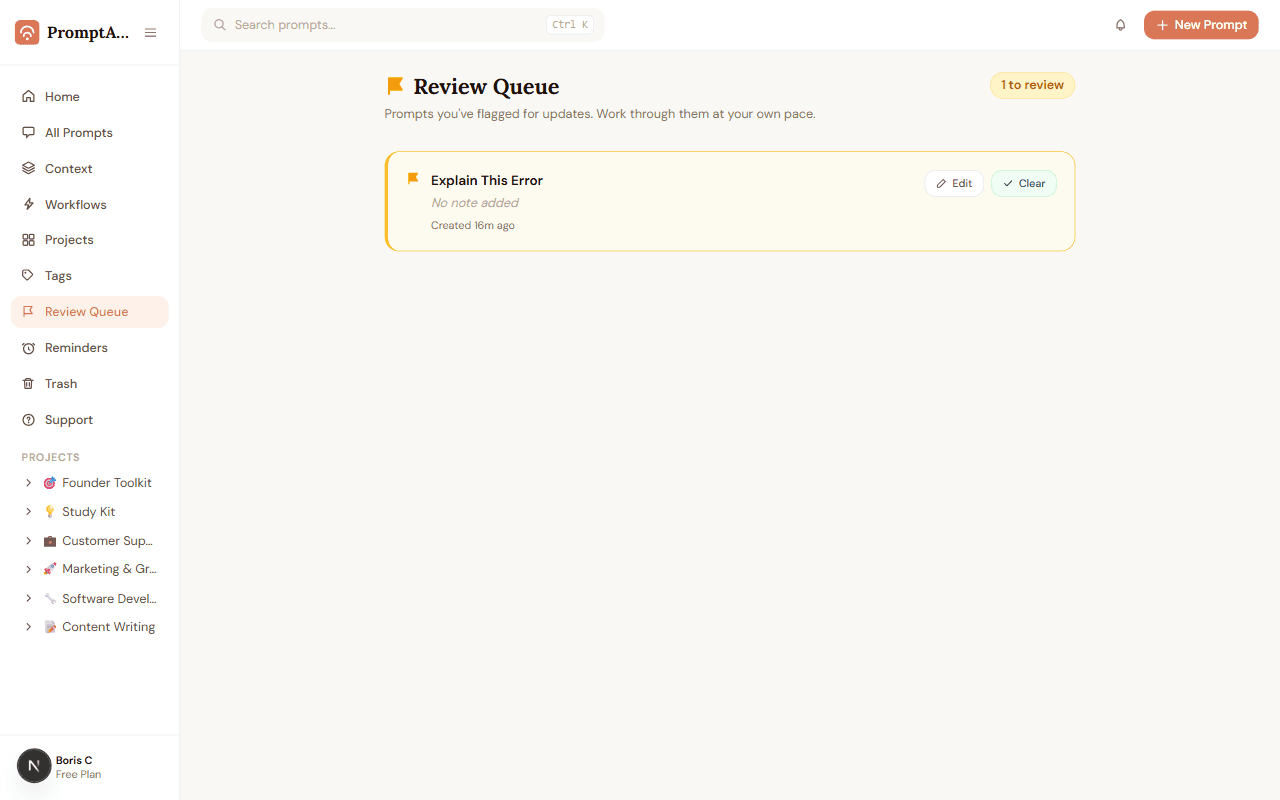
You notice a prompt is outdated but you're in the middle of something. Flag it for review now and fix it later — the Review Queue holds it until you're ready.
- 1Open any prompt and click the "Review" flag button in the header. It turns amber — the prompt is now flagged.
- 2On the prompt card in All Prompts, an amber "Needs Review" badge appears.
- 3Click "Review Queue" in the sidebar to see all flagged prompts in one place.
- 4Click "Edit" to fix the prompt. When you're satisfied, click "Clear" to remove the flag.
- 5The card animates out and the count badge in the sidebar decreases.
19
Context Blocks — save your context once
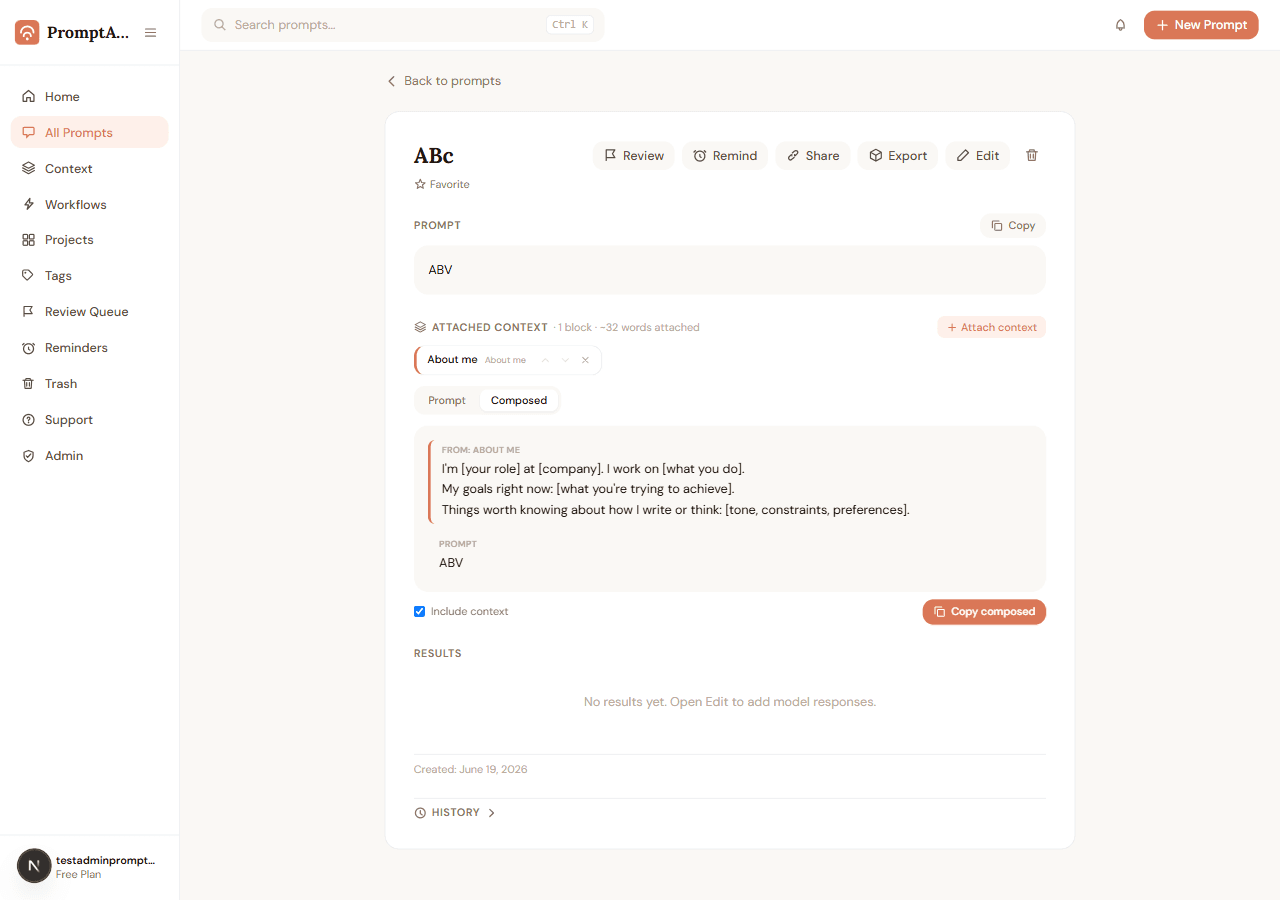
You retype who you are, what your company does, and who you're writing for into every new chat. Save it once as a Context Block, attach it to any prompt, and stop re-explaining yourself.
- 1Click "Context" in the sidebar — start with a starter card (About me, My company, Brand voice, My audience) or a blank block.
- 2Write the context and save it.
- 3Open a prompt and click "Attach context" — pick any blocks you want, in any order.
- 4Switch the prompt to "Composed" view and click "Copy composed" — the context and prompt are copied together.
20
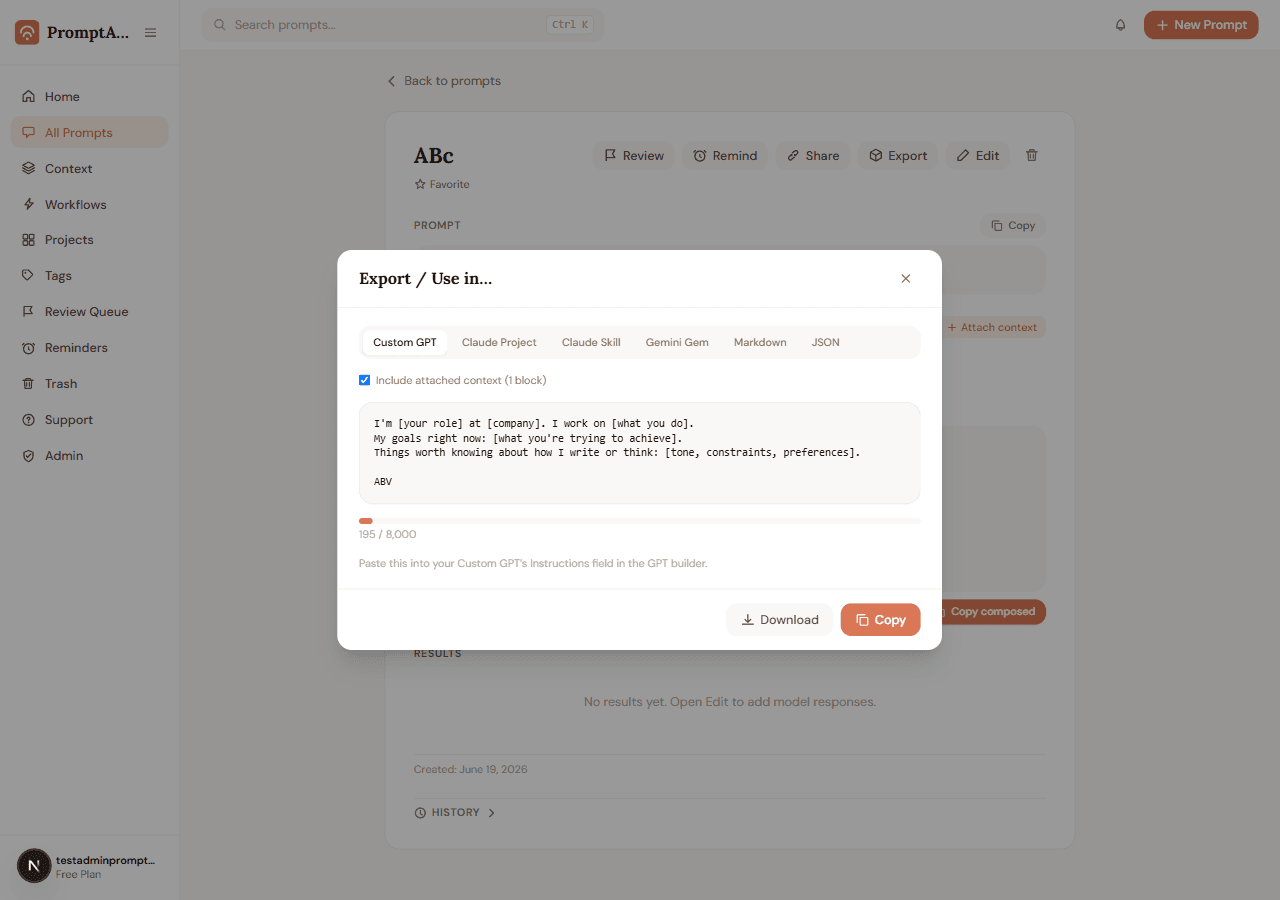
Export Anywhere — take a prompt to any tool
You built a prompt here. Now you want it as a Custom GPT, Claude Project, or Skill — without rebuilding it from scratch.
- 1Open a prompt and click "Export" next to "Share".
- 2Pick a format — Custom GPT, Claude Project, Claude Skill, Gemini Gem, Markdown, or JSON.
- 3Toggle whether to include attached context, then copy or download.
- 4Follow the one-line "how to use this" note for that format.
21
Free prompt engineering courses
PromptABCD includes a complete prompt engineering curriculum — 50 free interactive courses organized into 5 learning arcs, from writing your first prompt to building multi-step AI workflows. No account needed to start.
- 1Go to /learn — the Arc World Map shows all 5 learning paths and where each one leads.
- 2Start with any free-preview module. No sign-in required — your progress is saved locally.
- 3Complete exercises, live demos, and quizzes inside each module. Every lesson is designed to be finished in under 10 minutes.
- 4Sign in to sync your progress, earn XP, and unlock the next arc. Your local progress migrates automatically.